 I bought a 1999 version of the Leman Russ Exterminator, with the metal parts and Catachan 'passenger'. Two reasons, ebay and track wheels. I wanted to alter the tank to have visisble track wheels with track guards over them.
So here's the progress then
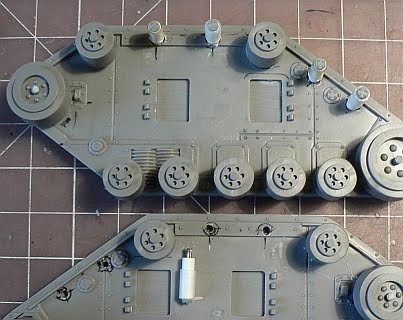
 I began by slicing away the mounting rings on the inside of the inner side plates
I then sliced off the details that would get in the way of the new positioning of the track wheels. Taking care to keep the round rivet plates intact as I wanted to use some later on in the build.

 The next lot was to make the wheels fit properly, since they were originally between the two side plates they now needed a bit of distance from the outer plate so that the track would fit.
So I:
cut 2.3mm cylinders (shims) from 7.9mm plas-tube for 10 small roadwheels
cut 3.9mm cylinders from 7.9mm plas-tube for smaller drive wheels x 2
cut 3.8mm cylinders from 9.5mm plas-tube for the large drive wheels
cut 3.2mm cylinders from 7.9mm plas-tube for the top four return wheels
cut 10.2mm lengths of 3.2mm plas-rod for the four (4) small top return wheels
cut 10.6mm lengths of 3.2mm plas-rod for the four (4) small rear return wheels
cut 8mm lengths of 4.8mm plas-rod to slide over the eight (8) small return wheels


I cut away the outer ring of the rivet plates and glued them onto the ends of the return wheels, adding much needed details quickly.

 Before I mounted all the wheels I sanded down the insides of all four side plates and glued the inner and outer plate together. The side hatches will still fit the recess so it doesn't make more work for you.
The next part that I tackled was the engine bay and rear of the tank. The old grid plate is chunky and not very detailed, so I thought that a 'Krieg' style set of filters would really bring it up to date and allow me to personalise the tank. I cut a plasticard plate to cover the orginal 'mesh'. I used the back end of a large spotlight, with the details removed as the filter dome. I cut a tube to the height I wanted it to protrude from the engine cover and took care to get the angle right, so that the dome on top would sit level and not lean over to the rear. I then glued angle 'L' shaped pieces all around the cylinder, making sure to cut the bottom off at the same angle as the tube itself. The dome was then glued on top.

This small filter is for the air intake into the crew compartment. I used the end of a pen nozzle (black part) and plastube again. I glued a piece of plasticard onto the top of the inner tube, then I scribed the mesh pattern onto the outer face of the inner tube. The thin ring fits inside the larger outer tube and seals in the 'mesh' plate. Small 'I' beam rod is used for the mounting.

This rear filter is a mimic of the Forge World piece as I thought it looked great. I used part of the power cables from the lascannon since it fit the angle, to bring air into the engine compartment.


The small vent you can see on the right side of the top plate is a small piece from a Rogue Trader missile launcher that was wrecked by its previous owner.

These are the start of the trench rails, quite an exercise in patience I'll tell you. Trying to keep a two mm wide strip lined up down the length of a curving piece of 1.2mm wide plasticard took many narsty words.

I built out the back of the tank by making a card template and then working from that to get the angles correct. The two exhausts were cut down to size and then I reglued the bottom pieces back on. A hatch on the top left side allows access to the engine bay. The two arms are stabilisers for the trench rails. I used plasticard cut at the right angle and then glued on angle card on the top and bottom to beef it up and add extra stability. The rivets were sliced from a thin rod into what the American's call 'chad's'. Each one is picked up on the tip of a brand new no.11 blade, dipped into a puddle of superglue and placed on the tank. More on that later, Meh!!!

The original autocannons are metal and twisted and look like a cheap attempt at converting a lascannon to look different, so they had to go. This is the construction that became my new autocannons. The tube on the right is exactly the same diameter as the original mounting, what a bonus!!

The turret is the old-school one, so I added the compartments onto the back to give it some more body. I cut away the pathetic attempt at loop-rings, drilled out and glued in pieces of bent wire. Much improved I think. At least you can hang stuff from them now. The extra amour was then cut to shape, also using a card template. I then changed up the original targeter mounting, making an open faceplate with sensors and lenses on it and added the extra plate that overhangs the front.
 Since I had to rebuild the main weapon I couldn't make it elevate or removable, so no hot-swapping on this Russ.
I wanted to use the original metal Heavy Bolter for the front gun, but it's mounting cylinder had shrunk badly and was an oval, so I cut out the plastic lascannon from its mounting and removed the warped cylinder from the Hvy Bolter, then glued the metal gun to the perfect plastic mounting cylinder. Lovely!!
There are no sponson guns, but a Hvy Stubber will adorn the turret ring for sure. This tank started as a modelling project and slowly evolved into the beginning piece in a small Imperial Guard force that I plan to build up. A good Infantry support vehicle, I'm hoping that it is worth it's weight in rivets by the end.
More to come, so (Matt) watch this space.
1 comment:
Awesome, great to see you're still up to tricks. You remember that Roleplay you started at the club? Well it's taken a few years, but I'll be joining in another IK one soon, and I can't wait. I'll probably dust down Lyssiandria for old times sake, and see where we end up.
Post a Comment